
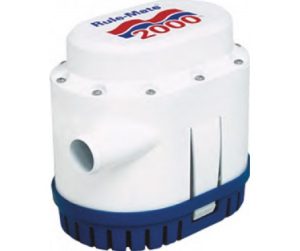
BILGE PUMP RULE MATE 2000 GPH – RM2000A-12V,24V-AUTO
$ 93.07
Description BILGE PUMP RULE MATE 2000 GPH – RM2000A-12-AUTO RM2000A-12V: Bilge Pump 2000GPH 12V • Automated bilge pump • All-in-one pump and float switch • No float switch required • Outlet Dia: 1-1/8″ RM2000A-24V: Bilge Pump 2000GPH 24V • Automated bilge pump • All-in-one pump and float switch How to Install onboard Bilge Pump Rule Mate 2000 GHP Installing a Rule 12V bilge pump on a boat involves electrical and plumbing work to ensure proper functionality and safety. Here’s a step-by-step guide: Tools & Materials Needed: Rule 2000 12V bilge pump Marine-grade wire (usually 14- or 16-gauge tinned copper) Inline fuse (15- to 20-amp recommended) Waterproof butt connectors or heat shrink terminals Marine switch (manual or automatic float switch) Hose (1-1/8″ or 1-1/4″, depending on model) Hose clamps Drill and screws Silicone sealant or marine adhesive Zip ties or wire clamps Wire stripper/crimper Step-by-Step Installation: 1. Choose Location Mount the bilge pump at the lowest point of the bilge where water collects. Ensure it’s in a spot free from debris and with enough clearance for maintenance. 2. Mount the Pump Clean and dry the mounting surface. Attach the pump using stainless steel screws. If using a base plate or strainer, secure it first and then snap the pump into place. 3. Connect Discharge Hose Attach the correct size hose to the pump outlet. Route the hose to a thru-hull fitting well above the waterline. Secure hose with stainless steel hose clamps. Avoid sags or loops in the hose to prevent water from sitting and backing up. 4. Electrical Wiring Use marine-grade tinned copper wire. Connect the black (negative) wire from the pump to the boat’s negative bus bar or battery ground. Connect the brown (positive) wire to a float switch or manual switch: Automatic setup: Wire the pump through a float switch to the battery with a fuse on the positive lead. Manual setup: Wire the pump to a bilge pump switch on the dash, with a fuse and optionally a lighted switch. 5. Add a Fuse Place a 15-20 amp inline fuse as close to the power source (battery or panel) as possible to protect the circuit. 6. Seal and Secure Wiring Use waterproof connectors or heat-shrink tubing. Route wires neatly and secure with clamps or zip ties. Avoid sharp edges and moving parts. 7. Test the Pump Pour water into the bilge to test the float switch if automatic. Manually switch on the pump to verify operation. Check for leaks at hose connections and ensure water is discharging properly. Why Choose Us? Extensive Selection: From stainless steel fittings to modern electronics, we stock a wide range of parts for every kind of boat and budget. Marine-Grade Quality: Our products are built to withstand the harshest marine environments, ensuring performance and longevity. Expert Advice: Our team includes experienced boaters and marine technicians ready to help you make the right choice for your vessel. Fast & Reliable Shipping: Get the parts you need, when you need them—thanks to our streamlined logistics and dependable delivery partners. Customer Satisfaction: We pride ourselves on exceptional customer service, backed by hundreds of positive reviews and returning clients. Competitive Prices: Get the best value without compromising on quality
🔒 Safe & Secure Checkout




 32605 Series Washdown Pump – 4 GPM – 60 PSI – 24V – Suits 12mm Hose